Parts of a Plant

French COLLECTIONMy husband and I love plants. Without a backyard, my apartment has transformed into a near greenhouse! Unfortunately, I have similar restraints in my classroom, as I have a classroom without windows (a crime, I know). Thus, I am forced to teach multi-sensory lessons about plants in a different way than utilizing natural light for students to plant seeds and watch them grow.

I owe the success of my plant unit to Stephanie Stewart’s “All About Plants Unit For The Common Core Classroom.” This plant unit is interdisciplinary and has been highly engaging and fun for all of my students including ELLs and students with disability. It offers students hands on projects, lab work, critical thinking, cause and effect, sequencing and more. The plant unit includes 2 weeks worth of lessons and activities to keep all first grade botanists busy in the classroom! I highly recommend this unit for any educators seeking to incorporate a hands on approach to learning about plants, who may not otherwise be able to get their students’ hands dirty with soil in the classroom.

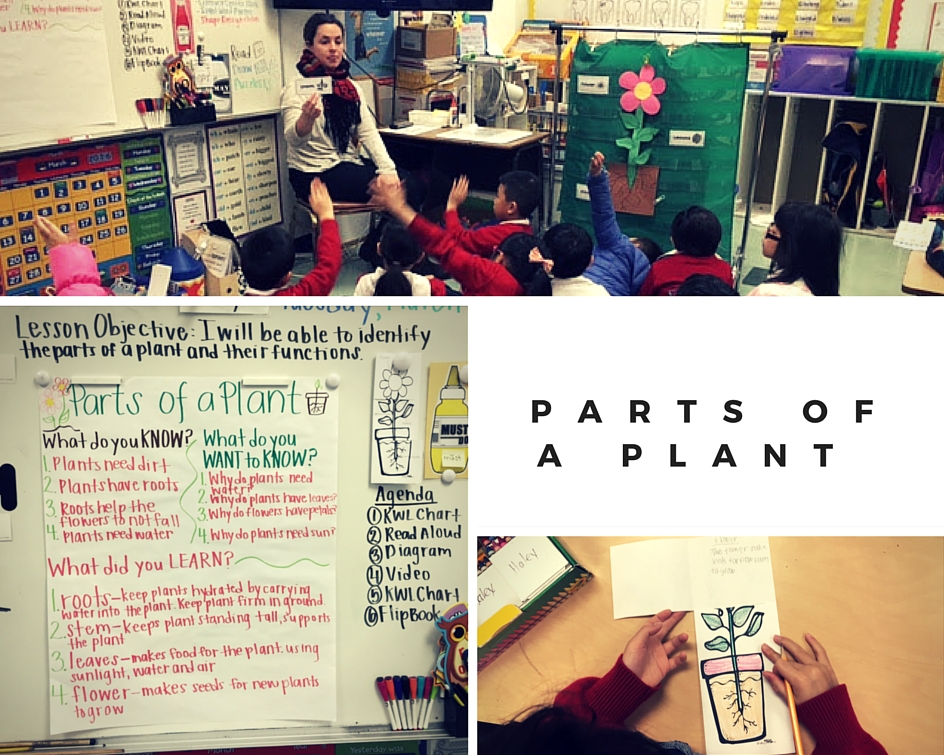
Day 1: Parts of Plant

Education Standards:

CCSS.ELA-LITERACY.W.1.7 – Participate in shared research and writing projects (e.g., explore a number of “how-to” books on a given topic and use them to write a sequence of instructions)

Supplies: 

  • Large scale plant diagram (hung on pocket chart)
  • KWL Chart  index
  • Card labels for vocabulary words (Root, Stem, Leaves, Flower)
  • “Parts of a Plant” informational text
  • Flip Book
  • BrainPOP, Jr. “Parts of a Plant” video
  • scissors, crayons/markers, pencil

Directions: 

  • First, introduce the lesson objective and schedule. Review class rules expectations of student behavior. Next, instruct students to turn & talk to share what they already know about plants as a brainstorming method. Students can share any two of the “three knows” – What I am sure I know or What I think I know. Count down from ten so students are aware of the time allotted for their cooperative talk. Call upon students to share aloud what they know and record students’ answers under the “Already Know” heading of KWL Chart. Then,instruct students to turn & talk again to share what they want to know about plants. After ten seconds, call upon students to share aloud what they want to know about plants and record students’ questions under the “Want to Know” heading of the KWL Chart.
  • Read aloud the “Parts of a Plant” informational text to the whole- group. To accommodate ELLs and special needs students, project the text onto the screen so students are able to read and/or follow along as it is read aloud. Cold call students to identify the vocabulary words introduced in the text (root, stem, leaves, flower). Call upon students to define the purpose of the plant parts in their own words. Record the vocabulary words and their purposes onto index cards. Place index cards onto pocket chart next to large scale plant diagram. To accommodate ELLs and special needs students, play BrainPOP Jr.’s “Parts of a Plant” video to increase students’ comprehensible input through alternative media.
  • As a whole-group, take the easy quiz following the BrainPOP Jr. “Parts of a Plant” video to answer questions about key details from the video to informally check for students’ understanding. To accommodate ELLs and special needs students, read aloud each question and the multiple choice answers. Then, direct students to turn & talk to their partner to determine the correct answer. After, re-read the answer choices and instruct students to give a thumbs up or thumbs down for each answer choice. Last, invite a student to the board to select the correct answer for each question.
  • Re-direct students’ attention to the KWL Chart. Inform students that they will be asked to share aloud something new they learned about plants. Count down from ten before instructing students to turn & talk to share their ideas to provide them time to think and recall what they have learned from the lesson. To accommodate ELLs and special needs students, prompt students with the sentence starter, “I learned that…” to provide support for students to speak in complete sentences. Record students’ ideas under the “Learned” heading of the KWL Chart.
  • Direct students’ attention to the large scale plant diagram hung on the pocket chart. Select students to move the vocabulary word labels next to the corresponding plant part.
  • Students complete the hands on Flip Book for the roots, stem, leaves and flower.
    1. First, students fold Flip Book in half.

    2. Next, students color their flower and then cut on the dotted lines.

    3. Then, students label the plant parts.

    4. Last, students write the purpose for each part by producing complete sentences inside the Flip Book. To accommodate ELLs and special needs students, allow such students to write the plant part’s purpose in short phases.

When I Am 100 Years Old…


IMG_2807 (1)One of my favorite writing lessons of the year is during our 100th day of school week! My students create self-portraits of their one hundred year old selves using a variety of materials. First, I write a graphic organizer on the board to record my students’ answers to the following questions: Where will you live? What will you eat? What will you do? What will you look like? Next, my students engage in partner talk as they discuss their answers to the questions. I provide my students with sentence starters in response to these questions to guide their dialogue and writing. For example, “When I am 100 years old I will eat…”.

Education Standards: 

CCSS.ELA-LITERACY.W.1.5 – With guidance and support from adults, focus on a topic, respond to questions and suggestions from peers, and add details to strengthen writing as needed.

IMG_2805 (1)    IMG_2804 (1)


Supplies: 

  • When I Am 100 Years Old… template
  • Colored construction paper
  • Yellow oval (portrait backdrop)
  • Circular peach construction paper (students tear into small pieces and reassemble to provide texture/wrinkles to face)
  • Cotton balls
  • Writing utensils – pencil, crayons, markers
  • Scissors & glue
  • Sequins
  • Fabric pieces (fabric swatch book)

100th Day of School Activities

100th Day of School Booklet 

My favorite 100th dayIMG_2835 of school booklet is by the Clever Classroom. This booklet helps students celebrate their first 100 days of school. Students are asked to reflect on their initial 100 days and complete a series of activities which target students’ number and operations skills in base ten. This booklet reteaches skip counting methods to 100 by 2s, 5s, 10s, and 25s.

This booklet additionally provides students the opportunity to write. For example, one of the activities asks students to write 100 words. In an effort to make this activity less challenging for my students, I selected ten different categories and required my students to write ten words in each category. Some of the categories include parts of speech such as nouns, which I divided into three different categories covering people, places, and things. Other categories included adjectives and verbs.

100th Day of School Embellishments 

On the 100th day of school, in addition to completing the 100th day of school booklet mentioned above, my students design necklaces and crowns to wear at school! My students create their necklaces using colored cereal O’s and pipe cleaners. I provide my students with a 100th day necklace hundreds chart and ask them to count to 100 using the cereal O’s. Once they’ve filled their necklace hundreds chart, I provide them with pipe cleaners and they string their cereal O’s onto the pipe cleaner one-by-one until their necklace has been assembled. My students create their crowns by coloring a “Happy 100th Day of School!” crown template, printed on white card stock, and glueing it onto a sentence strip.

IMG_2819IMG_2834

100th Day of School Project

IMG_2852The 100th day of school project is an opportunity for families to collaborate with their child to generate ideas, design, and create a collage of their choice to celebrate the 100th day! I provide my students/families with the following guidelines:

  • Students must use 100 small items to create a collage.
  • Students are to glue their selected items to a sizable poster board.
  • Students are required to skip count to 100 by 2s, 5s, 10s, 25s or 50s. Students’ collage items must be arranged on their poster board to reflect their method of skip counting.
  • Students must also complete the project presentation planner. This planner will prepare students to present their projects to the whole class. 

My students are expected to present their 100th day of school project to participate in collaborative conversations to enhance their public speaking and listening skills. After each students’ presentation, the presenter selects three students to ask follow up or clarifying questions about the presenter’s project. The presentation planner my students complete contains the following questions and sentence frames:

  1. What did you create your collage to be?

I created my 100th day of school collage to be ____________________. 

      2. What did you use to create your collage?

I used ____________________ to create my collage.

      3. How did you skip count to 100?

I counted to 100 by ____________________.

      4. Who did you make your collage with?

I made my collage with my ____________________.

      5. What is your favorite thing about your collage?

My favorite thing about my collage is  ____________________. 

Education Standards: 

CCSS.ELA-LITERACY.SL.1.3
Ask and answer questions about what a speaker says in order to gather additional information or clarify something that is not understood.

         IMG_2853                        IMG_2856

 IMG_2854

Presidents’ Day

IMG_3105Presidents’ Day is a favored federal holiday by most and is also a favored holiday of mine to honor in the classroom! George Washington and Abraham Lincoln are found everywhere and so it’s important for my firsties to understand why these presidents are so special. Similar to the SDAIE strategy I use to teach about MLK, I utilize the KWL Chart to record what my students already know about George Washington, what they want to know and what they have learned. My students learn about George Washington through an Easy Reader Biography, educational video from BrainPOP Jr. and lots of cooperative talk. Students demonstrate their understanding about George Washington by writing their own biography about George Washington. The information my students use to write about George Washington is drawn from our KWL Chart. My students’ work is then published underneath of a portrait they create of George Washington.

Education Standards:

CSS. ELA-LITERACY.SL.1.4 – Describe people, places, things, and events with relevant details, expressing ideas and feelings clearly.

CCS.ELA-LITERACY.SL1.5 – Add drawings or other visual displays to descriptions when appropriate to clarify ideas, thoughts, and feelings.

IMG_3102

Supplies:

  • “George Washington” by BrainPOP Jr.
  • “Easy Reader Biographies: George Washington” by Justin Martin
  • KWL Chart Paper
  • Writing Template
  • Blue, red and peach colored construction paper
  • Writing utensils – markers, crayons, pencils
  • Cotton balls
  • Doilies
  • Scissors & glue

Black History Month // MLK Day

IMG_2685 (1)Dr. Martin Luther King, Jr. is one of my favorite historical figures to study in first grade. I absolutely love to use KWL Charts, especially when we’re studying a historical figure. I use the KWL Chart to activate my students’ prior knowledge of MLK by recording what they already know about MLK. Then, I record what they want to know and what they have learned throughout the lesson. My students learn about Dr. Martin Luther King Jr. through an informational text, educational video from BrainPOP Jr. and lots of cooperative talk. Students demonstrate their understanding about MLK by creating a series of drawings and descriptions of his important life events and dreams for our country. My students’ work is published inside of a foldable.


Education Standards: 

CSS. ELA-LITERACY.SL.1.4 – Describe people, places, things, and events with relevant details, expressing ideas and feelings clearly.

CCS.ELA-LITERACY.SL1.5 – Add drawings or other visual displays to descriptions when appropriate to clarify ideas, thoughts, and feelings.

IMG_2677 
Supplies
:

  • “Martin Luther King, Jr.” by BrainPOP Jr.
  • Happy Birthday, Dr. Martin Luther King Jr. by Jean Marzollo
  • KWL Chart Paper
  • All About Dr. Martin Luther King, Jr. activity page
  • Peach & brown colored construction paper (for hands) 
  • Blue & red colored construction paper (for foldable)
  • Writing utensils – markers, crayons, pencils
  • Scissors & glue 

IMG_2679

IMG_2622


Valentine’s Day

IMG_8397Roses are red and violets are blue. Here’s my favorite Valentine’s Day craft, just for you!

Mod Podge is one of my favorite supplies to use when crafting. So much so, that I’ve converted it into a verb. Yes, “mod podg-ing”. Mod Podge is a wonderful concoction of glue, water and a few other ingredients. I make my own batch of mod podge mix to use in the classroom using 1 part water and 1 part glue. It’s an incredibly simple mixture to make and works perfectly as a sealant for those tissue paper crafts! I also use recycled cereal containers to host my homemade mod podge mixture. The glue dries in the container, and a day or so later, the glue can be easily removed from the container in one fell swoop! Then, the recycled cereal container becomes reusable for a future craft.

Supplies:

– A combination of red and pink tissue paper cut into small squares

– Large hearts printed or hand drawn onto white cardstock (heavier than standard printing paper)

– Mod Podge or DIY mod podge mixture (1 part water, 1 part glue)

– Containers (such as an individual cereal container) for Mod Podge

– Paint brushes, pencils, scissors and crayons

– Valentine’s Card template from 50 Month-by-Month Draw & Write Prompts by Danielle Blood

IMG_3037

Directions:

– First, students apply a small amount of the mod podge mixture to a small area of the heart.

– Next, students place colored tissue paper square onto the mod podge mixture. Then, students repeat the first two steps for the remaining surface area of the the heart. Allow the hearts to dry over night.

– The next day, brainstorm with the whole-class a list of adjectives to describe their parent(s). Record the adjectives on the white board or onto a poster that’s visible to all students. Students should refer to this list as they write their Valentine’s message for their parents – “Roses are _____, violets are ________. You are (adjective) and (adjective), too!”

– Last, students cut the Valentine’s message and glue it onto the back of the heart. And then, vuala!